Knowing that Labor Day is just around the corner usually makes me sad. Time seems to fly as we enjoy one holiday after another. But this year I am really looking forward to cooler temperatures and planning ahead for the spring.
While most of us think of spring as the time to plant, fall is an even better time to plan out garden beds and plant shrubs and perennials. Spring is a time when plants put all of their energy into growing foliage and the flowers and seeds necessary to reproduce. Fall is a time when plants put their energy into their roots and getting ready for winter survival. So planting in the fall allows plants to establish their roots and be ready for spring.
So while you may be all gardened out for the year, planting a few plants in the fall will help you get a jump on spring. In future posts, I’ll outline my favorite fall gardening chores you can do as the temperatures fall.
The fall is also a great time to create a new garden bed. You might be thinking – that’s a lot of work to dig out a new bed. And yes, it can be a daunting task to completely dig out a new bed, especially if you are doing this in what is now a grassy area. I’ve done this in the past, with my ex-husband and brother-in-law digging and using a rototiller to dig up and till our rocky clay Pennsylvania soil. It was a very time consuming and back breaking task.
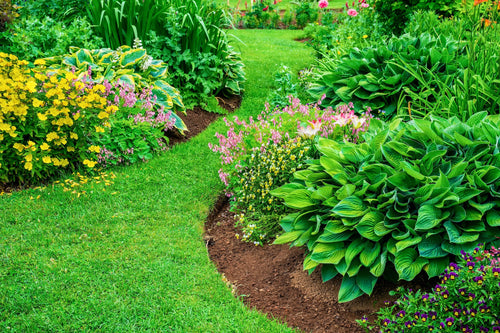
Below is a photo of part of the finished bed. The work was definitely worth it.

Since then I’ve learned a much easier way to do this. And instead of back breaking work, you can put your time into planning what you will do with your bed. Before you jump in and use the steps I outline below to create your new garden bed, take a few minutes to really think about it and how you are going to use it.
When I moved to my 2+ acre property in the woods, all I saw was lots of space to create and design new beds. And the ones we created were beautiful. However, the work to maintain what I created, grew exponentially. I did find that enjoyed the planning much more than the maintenance. As I got older and wanted to explore other hobbies, that maintenance took away from time I wanted to spend on other things. In fact my new significant other and I removed some of the beds that were there when I bought the property but really did not serve a purpose. And our property still required 11 yards of mulch to mulch all of the beds!

So first, think about what you are doing with this new bed. Perhaps it’s a vegetable garden to grow food or an herb garden to grow your favorite herbs for cooking. Maybe you’ve always dreamed of a cottage garden with flowers for cutting. Or perhaps you are adding landscaping with shrubs and a few flowering plants to accent your home and add curb appeal. Whatever the reason, make sure you have a reason that will stand the test of time and make the added maintenance worthwhile to you.
Next, take a look at the amount of sun that the area receives. Vegetable and many popular flowering perennials need full sun so be sure to take a look at the plants that you are looking to put in this area to be sure they will work well with the amount of sun the area receives.
If you are still ready to start your new bed, take a look at the new method I discovered. My method uses some very simple steps to create a bed that is ready for spring planting. Read on to find out how to create a new garden bed The Easy Way!
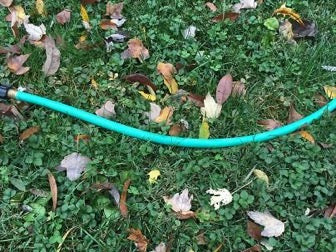
Step 1 Lay Out the Design
Find an old length of hose in your garden shed or garage and use it to outline your new planting area. I recommend an old length if you are going to use paint to make the edge. If you are going to follow my suggestion below and use sand or flour, you can use any hose that you have available. This trick is very useful if you are going to have a curved edge to the bed, so the more flexible the hose, the better. Using the hose allows you to play with your design until you have it just right. IMPORTANT TIP: When creating beds with curved lines, be sure to consider that you will need to mow around them. Tight curves might be aesthetically pleasing but they can be difficult and time-consuming to mow. Make sure that your design allows for easy mowing.)
Step 2 Mark the Edge of Your New Bed
When you are happy with your design, mark the edge with sand or flour and then remove the hose. Next, edge the area with a spade, shovel or edging tool. You can simply do a quick outline or you can completely dig the edge. To prevent grass from growing back into the bed, the edge should be about 8" deep and several inches wide.

Step 3 Cover and Amend
If your new bed is currently covered in grass, mow the grassy area and cover it with cardboard. This is a great way to recycle those Amazon boxes! Next add top soil, compost and other organic material like grass clippings, leaf mulch, etc. on top of the cardboard.

Step 4 Relax and Wait!
Allow the new bed to sit until spring and let nature do your work for you. The grass underneath the cardboard will die and the organic material you have added will have a chance to compost over the winter.
That's it! When spring arrives you can till the bed and compost to get the bed ready for planting. But for now, enjoy the fall knowing that you got a major jump on your spring gardening chores!
Are you planning a new garden bed this fall? How do you like to create your new beds? Comment below and let us know your thoughts – we’d love to hear from you!


Hi Doris:
You can add add top soil, compost and other organic material like grass clippings, leaf mulch, etc. on top of the cardboard. This will hold it down and help it decay which creating the new bed.
- Donna Moyer Dec 09, 2024
How should I anchor the cardboard boxes so they don’t blow away? Thanks
- Doris Dec 09, 2024
Hi Terre:
I would wait until the soil is properly prepared before planting bulbs.
Good luck with your new bed!
- Donna Sep 06, 2018
When to plant new bulbs if ground not prepared … thru the cardboard? I havwme cardboard already down to kill grasses but it’s not ready for bulbs.
- Anonymous Sep 06, 2018